

Set up an MS Teams group for your Canvas course – and synchronise the student list via MS PowerAutomate
MS Teams has its advantages for teaching. If I have to teach online (rather than face-to-face), I prefer to do so via MS Teams. I also run my office hours online via MS Teams and use a ClassNotebook in OneNote via MS Teams. However, a big challenge typically is the synchronisation of your student membership. Typically, students enrolling in a course become members of my Canvas shell through which we publish our course content. Since there is no easy way to then synchronise that student list with MS Teams, I developed an automation in MS PowerAutomate years ago (during the Covid lockdown). That PowerAutomate automation takes the list of students from Canvas and automatically adds the students to the MS Teams group I have set up for my students.
While I am not currently using this functionality myself, I had a colleague asking for the functionality. And since I couldn’t find my old blog post about this anymore, I decided to quickly recreate this post and share the automation here.
So, let’s go through this step by step:
Step 1: Set up an MS Teams group.

You should first set up an MS Teams group for your students. I prefer to set up a “Class” group, as it has some additional functionality that can prove useful for a class (such as having a shared ClassNotebook).
Step 2: Download the MS PowerAutomate Flow and import it into your MS PowerAutomate environment.
You can download the Flow here: Synchronise Canvas Shell Students with Team Site
When importing it, you may want to add the name of the course for which you plan to use it to the beginning of the name (so you later don’t get confused, if you have multiple of these flows running). The flow requires a connection to your MS Teams account, so it can read the list of Teams groups you have set up there and add students to the teams group you select.
Step 3: Configure the Flow
In this step, you will have to configure the Flow so it works for your MS Teams group and your Canvas shell.
You will have to configure the 2nd to 5th step of the flow as follows:

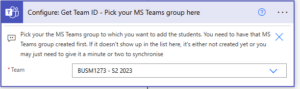
Configure: Get Team ID - Pick your MS Teams group here
Configure this step by opening up the box and selecting the MS Teams group you have set up for your course. The Flow will then use that MS Teams group and add the students it finds on Canvas to this MS Teams group.
Configure: Get Team ID - Pick your MS Teams group here
Configure this step by opening up the box and selecting the MS Teams group you have set up for your course. The Flow will then use that MS Teams group and add the students it finds on Canvas to this MS Teams group.
Initialise CanvasUrl string
Open this box and check the Value field. It should contain the URL where your organisation finds their Canvas shells. The flow will use this URL to access the API (Application Programming Interface) of Canvas for your organisation.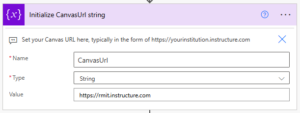
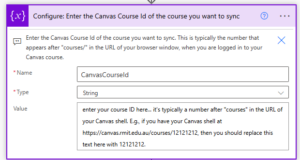
Configure: Enter the Canvas Course ID of the course you want to sync
Open the corresponding box for this step and replace the “Value” field with the ID of your course. You can typically find that ID as part of your Canvas URL.
E.g., when opening my course’s Canvas shell on a web browser, I may see the following URL in the address bar of my browser:
![]()
I’d the use the 57273 as the value that I paste into this “Configure: Enter the Canvas Course ID…” step in my Flow, overwriting the text that’s currently in it’s “Value” field:
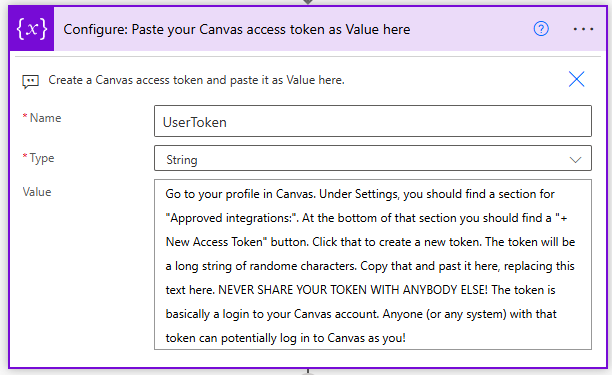
Configure: Paste your Canvas access token as Value here
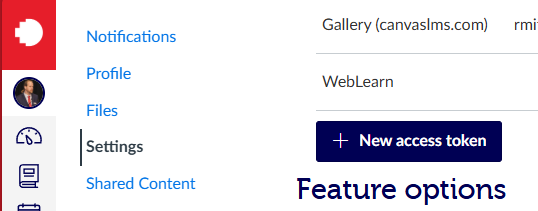
To create an access token, go to your Profile page on Canvas, there, go into “Settings”. Under “Settings”, you should find a section for “Approved integrations:”. At the bottom of that section you should find a “+ New Access Token” button. Click that button to create a new token.
You may want to give that token a meaningful name via the “Purpose” field. Also, you may want to consider setting an expiration date. Typically, the end of the semester might be a good expiration date, as the automation shouldn’t have to login to your Canvas shell at that point anymore.
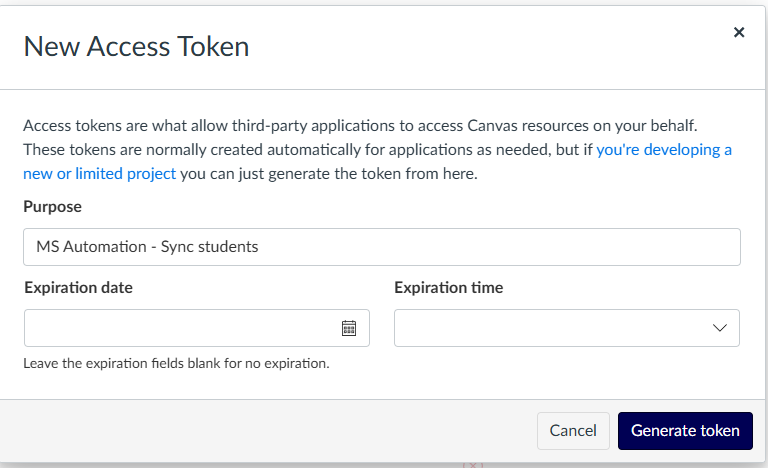
Once you click the “Generate Token” button, you will be presented with the token – which is a long string of random characters. Copy that entire(!) string and paste it in the “Value” field of your automation step “Configure: Paste your Canvas access token”, replacing the existing text there:
Step 4: Review the flow
With the Flow configured, it’s important you understand what it does before you enable it. You don’t want to use flows from random people and have them potentially steal information or delete your information. So, make sure you understand what the flow does before enabling it.
About the author : Frank

Recent Comments